Are you ever bored and looking for something to do, but not sure how to occupy your time? You don’t want to watch television or play on the computer as you are in the mood to do something unique and creative. Good news! There are several crafts that can help chase away boredom. Many of them use materials that you may already have at home, so you won’t have to buy any supplies to make them. Let us know what you think about these crafts to do when you’re bored.

Table of Contents
1. Inspiration Board

Photo Credit: Pixabay
Source: https://www.tckpublishing.com/how-to-make-an-inspiration-board/
Supplies Needed: Old magazines, paper, glue, scissors
Do you have a bunch of old magazines laying around the house that you’ve already read? If you do then this is the perfect craft for you.
An inspiration board can help you stay positive when times are tough. It can also provide encouragement when you are trying to reach a life goal.
To make an inspiration board, first determine your theme. For instance, if you want to visit a certain place then your theme would be travel. For an encouragement board, your theme should be positive messages or uplifting images.
Next, round up all your magazines and cut out anything that you find that fits in with your theme. Then, glue all these items onto a piece of paper, or even a poster board if you have one available. Once the glue has dried, find a place to hang up your board so that you can view it every day and soak up the inspiration.
If you enjoy this type of craft, check out our paper crafts post.
2. Rustic Vase
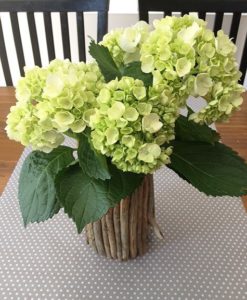
Source: Greco Design Company
Supplies Needed: Sticks, scissors, plain glass, hot glue gun, glue sticks
This craft is a great way to turn a plain glass into a beautiful vase. To begin, choose a large glass that doesn’t have any sort of decorations or emblems on them. Next, go outside and collect about 10-15 sticks.
Once you find all of the sticks, head back inside. Plug your hot glue gun in to let it warm up. Use scissors to cut the sticks down so that they are about half an inch taller than the height of your glass. You don’t have to cut the sticks exactly the same length. Attach the sticks to the outside of your glass using a hot glue gun to make a beautiful, rustic vase. Afterward, you can fill the vase with your favorite flowers.
3. Personalized Coffee Mug

Source: https://www.popsugar.com/smart-living/Sharpie-Mug-DIY-Project-24955886
Supplies Needed: Plain coffee mug, permanent markers, oven
Many of us indulge in a cup of coffee every morning. What this means is that our coffee mugs get a lot of use! You can restyle your coffee break or make a memorable gift by creating a personalized coffee mug. This craft is easy to make and perfect for gifting.
To start, you will need a plain mug of any color. Next, use permanent markers to create a design on the mug. You can use any colors you like and any sort of design. If you are making the mug for someone, choose a design that will be meaningful for them.
Once you finish decorating the mug, place it in a cold oven. Turn the oven’s temperature to 450 degrees. After the oven preheats, set a timer to 30 minutes. When the timer goes off, turn the oven off, but leave the mug inside. Set the timer for another 15 minutes and once it goes off, crack the oven door open. Let the mug sit inside overnight to allow the permanent markers to set completely. The next morning remove the mug. Your new mug is now ready to use!
4. Tin Can Windsock
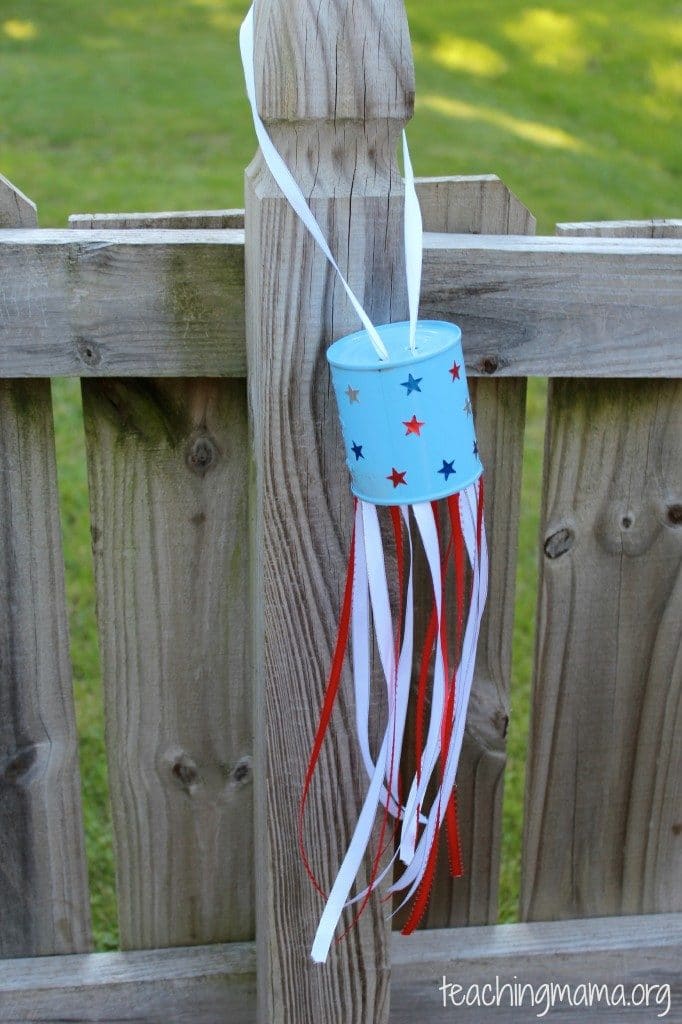
Source: https://teachingmama.org/tin-can-windsock/
Supplies Needed: Tin can, ribbon, scissors, hot glue gun, glue sticks, screwdriver, hammer, paint, paintbrush, bells (optional)
The next time you open a can of soup or vegetables, don’t throw the can away. You can use it to make a tin can windsock.
To begin, remove the label from the can and wash it thoroughly. Dry your can and set down with the unopened side facing up. Place a screwdriver on the top and hit it with a hammer to make a hole. Make another hole about half an inch apart. Paint the outside of the tin can anyway you like. You can paint it one color or make a design. Set aside and let dry.
When the tin can is fully dry, plug your hot glue gun in so that it warms up. Use scissors to cut some ribbon into 2-foot strands. You’ll need around 15 pieces. Glue about half an inch of a piece of ribbon to the inside of the tin can. Continue gluing pieces around the inside until there is no more ribbon left.
Cut a 3-foot section of ribbon and string through the holes in the top of the tin can and then tie a knot inside. This will be used to hang it up. If you’d like, you can also string bells through the bottom of each of the 15 pieces of ribbon so that your windsock makes noise on a windy day.
5. DIY Paper Flowers
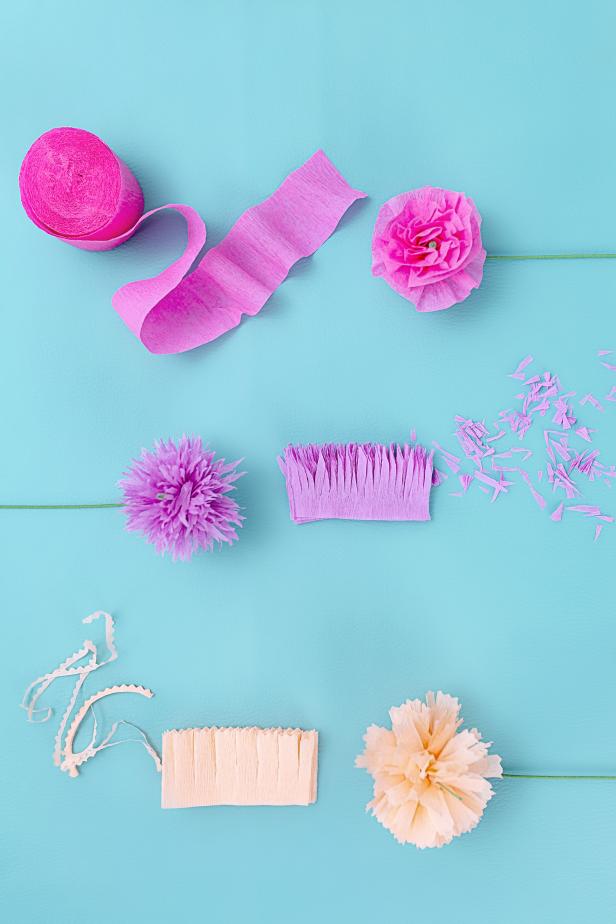
Source: https://www.hgtv.com/design/make-and-celebrate/handmade/easy-diy-paper-flowers
Supplies needed: Crepe paper streamers, green masking tape, glue dots, pinking shears, floral stems, scissors
Planning a bridal shower, brunch, or themed party that could use these adorable DIY flowers? We highly recommend trying your hand at these easy-to-make crepe paper flowers. These would look great as centerpieces for the next event you have planned.
To create these whimsical flowers pre-cut a few pieces of masking tape for each of your flower bases. Be sure to have two pieces of tape for each flower. Simply cut the corner of each piece of tape to make it into a cone shape.
Now, we’re ready to create some stunning paper roses. Start by measuring and cutting a 3-foot piece of your crepe streamer and then gently pull and stretch one edge to create a ruffle-like effect. Next, wrap two glue dots around your floral stem keeping them about 1-inch from the top. Now you can begin wrapping the crepe paper around your floral stem, pleating your unstretched side of the paper as you go.
You should see the shape of a rose beginning to form in your flower. Once you’ve reached your desired size and shape, be sure to secure your flower to its stem using two pieces of your green tape.
If you’d like to learn how to make a carnation or spider mum to go along with your roses, check out the step-by-step instructions with photos on HGTV.com.
6. Reversible Tassel placemats
:max_bytes(150000):strip_icc():format(webp)/diy-tassel-placemats-2-59d43648d088c00011a4cb6c-59d6871dc4124400103de358.jpg)
Source: https://www.thesprucecrafts.com/diy-reversible-tassel-placemats-4152952
Supplies needed: Fabric of your choice, sewing machine, yarn, scrap of cardboard, scissors or rotary cutter, cutting mat, embroidery needle, sewing notions
Easily spruce up your outdoor patio or dining area by adding some vibrant placemats. These are simple to make but look like something plucked right from the pages of a magazine. We’re certain your friends and family will be asking for their own set once they see them in your home.
To create these fun placemats, start by cutting your fabric into a 19″ x 14″ rectangle. For your two-sided placemat you’ll want two pieces of fabric to pair together. Then, using a straight stitch, sew the two pieces of fabric together stitching all around the edges but leaving a 2″ gap along one side. Note: These two sides of your placemat will eventually be the inside, so be sure to choose fabric accordingly.
When you’ve completed your sewing, pull your fabric right-side out using the gap you left when sewing.
Next we’re going to start creating our tassels. Cut a scrap of cardboard about 3″ wide and begin wrapping your yarn around it about 30 times. Following this step, slip an 8″ piece of yarn around everything you just wrapped and create a double knot at the top of all the yarn loops.
Gently pull the wrapped yarn off of your cardboard. Now cut an 18″ piece of yarn, being careful to leave a 3″ tail, and start wrapping the yarn around the top of the tassel. Wrap approximately 10 times and double knot it to itself. Should be seeing a tassel taking shape!
Using your scissors, trim the bottom of your tassel so all strands are the same length. Finally, using your embroidery needle, attach your tassels to all four corners of each placemat and close the gap.
For full instructions and steps, visit The Spruce Crafts!
7. Heart-Shaped Bookmark
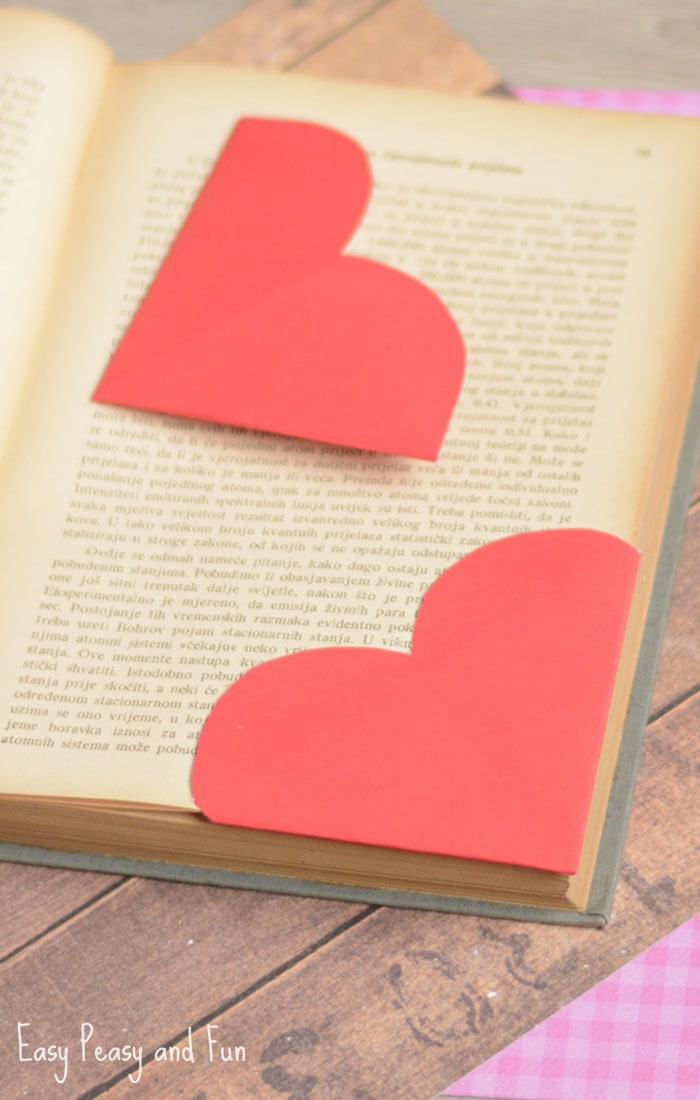
Source: https://www.easypeasyandfun.com/heart-corner-bookmarks/
Supplies needed: Origami paper, scissors
Creating your very own bookmark in the shape of heart is simple and fun to do. You’ll love keeping these on hand to mark your place in all your favorite reads this year!
Start this simple craft by folding the origami paper diagonally across both diagonals. Then fold into a triangle. Grab the top of the triangle and fold it toward the bottom.
Next, fold the left and right angle towards the middle and immediately unfold the fold you just created. Fold the left and right angle towards the top that you’ve just created. Finally, cut your desired heart shape with scissors. And you’re left with cute bookmark that you’ll love using again and again.
As you can see, there are a variety of different crafts that you can make at home while you’re bored. One of the nice things about these crafts is that you really don’t need any special materials to make them. Most of the items you’ll need you probably have at home anyway. So the next time you are bored, don’t just sit around wishing you had something to do. Make a craft that you can display around your home or give to someone as a gift. And if you’re stuck in quarantine, these will help pass the time!